Making blog

Soldering went pretty well. First, I drew up a careful circuit diagram, to make sure I had a good reference to work from, in case anything went wrong (picture). Secondly, I laid out all the main components on a perforated board - you can see them in the picture: the Arduino, the MP3 player, the clock (with a battery), 4 transistors, and some resistors. After that, soldering went pretty quickly. I did have one bad contact, but it wasn't too hard to fix. The spaghetti mess has been tamed!
Now I will take a cuff for measure pressure and cross it into a hat(like a pilot's cap)
To get a holistic thing, I must first check all its components separately. At first — servomotor.
Finally the tent was created! and it was time to decorate! we all pitched in as a group and it was all hands on deck. to drape across the top of the tent we had this hemp fabric the dyed in a galactic colour pallet of deep purple, blue and red. we then embellished that with draping feathers to pay homage to the dreamcatcher. we believed that this was a nice touch and made it more distinctive than any other ordinary tent from the outside. we stoned the inside of the tent with gems. to add a personal touch to the dream tent. we made our star sign constellations into the tent which was nice. we kept the colour theme through out which is what made this tent so strong visually. as a group, we were all so pleased with the final outcome and hope that this lovely idea comes to an astronaut soon as it could help them feel more at home in there fairly metallic and cold environment.
It was finally time to start the actual making of our tent. We went for a dark blue fabric because we loved the colour and the quality was amazing. The fashion students had a lot to do in that department as they are the most experienced and also very talented on the sewing machine! in the mean time whilst the fashion students were creating the magnificent tent, the interior design students were to investigate what kind of atmosphere we wanted to create. This was exciting because the child that created this tent didn't really give anything when it came to the actual inside of the tent which gave us a big opening to do something imaginative and creative! seeing as this may not go into space and we considered the practicality of it actually going into space, so we decided if it ever did or didn't that we would bring the stars into the tent itself creating a perfect sleeping atmosphere. The fabric for the tent is also very dark so it blacks out the entire of the inside of the dream tent. We brought in a star projector also and had the idea of embellishing the interior with gems and stones so that the star projector would reflect light off of them. Attached is the star projector and a visual of the interior of the tent prior to it being made
We needed more of a realistic visual of what the tent would look like. This was after choosing the original shape of tent from the original drawing after the model making and research! Creating a visual on photoshop was straight forward and assisted along side the research and model making. This then lead on to the exploration of what a dream tent actually is and what paths could we potentially go down when it came to concepts for this imaginative tent. Dreamcatchers became a hot topic in our group. We wanted to incorporate that into the tent design because it is for sleeping after all. images provided are visuals and the development of our dream tent concept.
We began with our research and how we were going to start with the tent. Firstly we had to consider a lot of things. Such as how we were even going to make the tent, what colours we should use and the logistics of this dream tent that is meant to accommodate astronauts. However, we wanted to remain as close to the original idea as much as possible! We researched different colour mood boards as well as textures and how practical the fabric of the tent must be. We decided to go for a space themed colour pallet using blues, purples and other deep colours. We considered the form of the tent as well, exploring Tipi tent styles that we were very much leaning toward. if we went through with that idea then it wouldn't have looked anything like the Childs idea which would have gone against our idea of staying as close to the original drawing as much as possible. A couple of the members of the group were set to explore the various shapes and textures the tent's potential so we could determine as a group which direction that we were going to take this in. I have captured imagery from our instagram account to demonstrate the work involved at this particular stage.
As first year students at Manchester Metropolitan University, as a group of 6 3 being fashion students and the other 3 being interior design, we were given the brief of choosing an invention from this website and actually bringing it to life. At the beginning of this project we, as a group chose this tent as it was a great balance of fashion and interior design. As a group, we were most drawn to the dream tent because of the thought behind this interesting idea and the well thought consideration for the astronaut touched us all! Also that we had to consider the fabric and style of the said tent as well as what the inside will be like and what sort of atmosphere you wanted to create being as we were a fashion/interior design collaboration we wanted to all be equally useful practise our passions!
Finally we painted the robotic space dog using a silver, metallic finish spray paint so that it looks as close as possible to the child’s drawing.
We then attached both the legs and the head to the body using screws and bolts, to create more stability within the frame. By creating a wooden frame, along with thin metal wire, it allowed us to attach workig wheels so that the dog will move.
The next step was to create the X-Ray vision eyes, to do this we added small glass cubes with battery operated lights behind them, when switched on this would give the impression of small laser beams.
We then used Mod Rock to create smoother edges on the entire structure of the dog.
We then created the head the same way, after studying how a boxer dogs head would be, we used a boxer dog as we thought it was the closest to the child’s drawing. We then began to add contours out of cardboard to create a more muscular finish.
We then began to create the dogs body in a similar way to how we created the legs, with both cardboard and tape. We used the legs as a template for how large the dog should be.
We then began to make each leg 3-Dimensional by folding cardboard into the desired shape, by adding a sheet of thin plastic, it would add strength to each leg.
We then began collecting various materials, including a few metallic household objects that we may be able to use along the way. We then created a template for each leg which allowed us to make sure each one was the same size, so that the dog would eventually stand.
We began the design process by creating a prototype out of cardboard, this helped us to visualise the sizing of each component. We then covered the cardboard in silver tape so that we could achieve the desired effect.

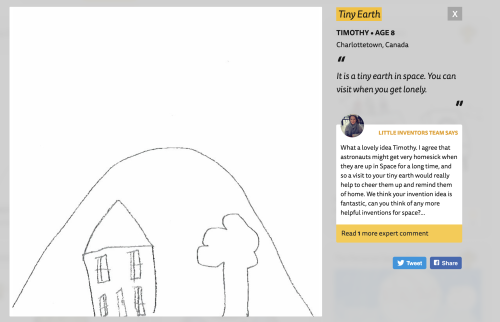
Armed with 500 paper straws and 3 glue guns we set about constructing our 4 ft geodome that will form the outer shell of Tiny Earth. We used straws that were 19cm long to provide strength to our structure and more detail.
It took 3 of us (and some helpful friends) 5 hours to get the dome almost completed!
Here's what it looked like to create:
