Making blog
I started by taking a slipper apart and experimenting with the slipper base. I attached suction cups to the bottom, firstly with screws ( obviously not safe to wear at this point!) to assess how they would work on the feet. Once deciding this was the right path I sourced different size suction cups to see which size would be the most effective. I chose a 30mm size. Next I sourced nuts and bolts, the nuts had to have 'cover caps' which protect the bolt from sticking into the foot.
The finished animation complete with voice over and sound effects. Thanks to Opal, Lola and Anna! What a great collaboration!
(Sound effects from Zapsplat)

The model of Band 101 with the ISS, ready for display.

While I was still working on the animation, during our Skype chat Opal agreed to doing a voice over for the animation piece as if the astronauts in the ISS were talking to each other. I gave Opal a rough script and she added her own spin on it recording it with her friend Lola. It seems like they had fun doing the recording! Opal's mum also offered to add some sound effects into the mix, she used sound effects from Zapsplat and compiled the sounds together in an application called Camtasia.

Once the photographs had been captured, I brought all the images into a program called After effects so I could put the images in sequence and add some special effects in like stars, meteor dust and comets. I also removed the strings that were holding the elastic in place.

Now it was time to animate the model so that you could see how the invention would work. I set up the models and used a roll of green paper to make a green-screen so that I could make a starry background go behind the models on the computer. I photographed each movement of the solar panels rotating and the satellites moving into position. The satellites were on ball and socket joints so that they could move. For the meteor I used a piece of foam, sprayed and painted with metallic pigment to give it that other-worldly sheen! It was quite hard to keep the elastic in place to make it look springy so I ended up tying black threads to the elastic so that it could be pulled back and forth a bit like a puppet string!

Once the model was assembled I showed it to Opal over Skype and we had a great chat about her idea and the process of making the model. She came up with an extra idea about having a cable connecting Band 101 with the space station so I incorporated that into the design too.

I needed the web of Band 101 to be stretchy like in Opal's diagram so I used silver elastic threaded through holes in the ring, gluing them in place so that they would be secure. I used lots of different bits and bobs from old computer parts to plastic packaging to make the ISS and the satellites on Band 101, then sprayed them all silver so they matched.

The first step for me was drawing out a large drawing plan based on Opal's drawing and getting together some materials that might work for the various elements. I thought an embroidery hoop would be good for the band 101 ring and mosaic tiles would work as solar panels.
The magneton has come to life! I made two illustrations that I proposed to the inventors for them to choose. We made a Skype video-call and we discussed of making a new illustration modifying what they liked the most from both: instead of a Mars landscape with no characters or a Moon landscape with a girl astronaut, they suggested a Mars landscape with the girl astronaut and her pet dog astronaut. I printed the jig-puzzle pieces on card stock instead of magnetic paper because the magnets were not strong enough to hold on to the game board. I glued the pieces with hot glue and left it uncompleted as if it was "in progress". It was really fun to make!
Une fois les gants placés sur leur socle en acrylique, on peut apercevoir le détail des «grippes» qui permettront aux astronautes de manier différents outils dans l'apesanteur de l'espace sans risquer de les échapper!
Hi Spencer Barclay here, the project is complete and I couldn't be happier with how it turned out. I put together a final video, an homage to all of my favourite Science Fiction films. Enjoy!

Mettre en valeur des objets intéressants, c’est carrément le métier de Nancy. C’est pourquoi malgré le délai serré, elle a insisté pour que les gants soient à leur meilleur lorsqu’ils seront exposés. Pour cette étape, elle a d’abord fabriqué un « squelette » à l’aide de tiges de métal de mousse pour présenter les gants comme s’ils étaient portés par une main d’astronaute. Elle a ensuite fabriqué une base d’acrylique sur mesure pour servir de support. Elle a choisi un tube transparent pour montrer le gant gauche en action et a placé le gant droit sur une autre tige pour en montrer les détails.

Au Québec, on utilise plusieurs anglicismes, parfois même volontairement lorsqu’on souhaite mieux présenter une idée. Avoir une bonne prise c’est bien, mais avoir une bonne « grip » en déménageant un frigo, c’est essentiel. Par contre, comme aucun dictionnaire ne fait état de cette subtilité culturelle, le nom de l'invention « Gants avec des grippes » a été traduit traduit littéralement par « Flu Gloves ». Est-ce que ça veut dire que les gants sont contagieux? Je ne crois pas. Est-ce que ça les rend encore plus rigolos? Certainement.

-

On a d’abord été tentés d’adapter le design de Tiffany pour remplacer le logo de la NASA par celui de l’Agence spatiale canadienne. Après tout, la NASA (National Aeronautics and Space Administration) est états-unienne et David Saint-Jacques est un astronaute canadien. Un détail nous a cependant porté à remettre en question cette décision : le logo rouge utilisé par Tiffany représente un logo utilisé par la NASA surtout dans les années 1970 et 1980 affectueusement surnommé « the Worm ». On cessa cependant de l’utiliser en 1992 et la version « Meatball » qu’on voit aujourd’hui fut restituée. Compte tenu que l’Agence spatiale canadienne (ASC) n’a vu le jour qu’en 1989 (et son logo en 1996), « the Worm » et le logo de l’ASC ne se sont finalement jamais côtoyés. Comme on aime beaucoup le look rétro du logo rouge sur les gants, on a choisi de le conserver et de rester fidèles au design original.

Après une première discussion avec Tiffany pour préciser comment elle imaginait les gants, Nancy s'est mise à la tâche. Elle a mis un point d'honneur à reproduire le plus fidèlement possible le design imaginé par Tiffany. En se basant sur le dessin et la description, elle a d'abord choisi des gants de cuir blanc qui rappellent un peu les gants portés par les astronautes de certaines missions Apollo. Elle y a tracé les détails, notamment le fameux logo NASA.
Pour les « grippes » Nancy a choisi de déroger un peu à la description. Plutôt que d’utiliser du caoutchouc, elle a opté pour des petites appliques de crochets (la face *cro* de velcro) qu’elle a peint en gris métallique et qui rappelle plus fidèlement le dessin de Tiffany.

Hi, Spencer Barclay here. During our Skype chat at the beginning of the project, William’s teacher Madame Karine, suggested that the interior be designed to look like astronaut David Saint-Jacque’s home. David is a father of 3, so I made a large screen TV with 3 children playing, much like a scene from a documentary about David Saint-Jacque that William’s class watched.
I decided to make the interior look appealing to anyone, I included a dog, which is probably a robot, so is a bit easier to maintain in space. There is no gravity in the Space Homes, so everything is covered with Velcro to help give the sensation of being at home. I added a few details to also give it an appropriate Science Fiction feel, but I think it still looks pretty cozy with the giant couch.
I put all of the detailed Space Homes with the now-finished Interior onto the tube structure and started to run all of the wiring for the several lights I included, my favorite is the flashing red airlock light. Once the wiring was finished, I could finally install the Space Homes structure onto the display base, which was a great moment.
I added a few astronauts that I modified from some existing hazmat suit figures, sculpting helmets and then carefully painting them.
William had this great idea that a robot arm or a grabber claw would be helping to build the Space Homes, so I included a detail of one of the solar panels being installed by the robot arm.
I created a video showcasing the finished Space Homes, a sneak peek just for William and his class. William was excited even by the first mock-up of Space Homes, so I knew he was probably going to like the finished product. Watching William watching the reveal of the Space Homes, I could tell he was happy with what I put together, it was such a pleasure bring his invention to life.
When I was young there was several older creative people who not only took the time to explain what they were doing and how they made it, but they got excited about what I was making. I think it’s important as an adult, as a maker, to complete the circle and show a child the joy of creativity, an entire career path really. That’s why it’s so wonderful that Little Inventors is connecting young people with professional makers, finding an effective way to make these collaborations possible. I’m already looking forward to my next project with Little Inventors, there’s no shortage of amazing inventions just waiting to be made.
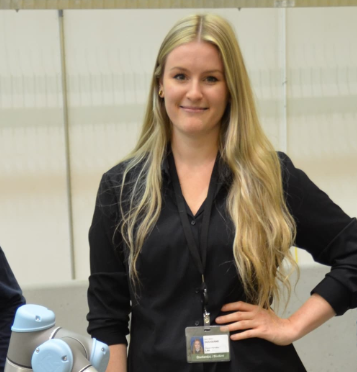
I finished the personnel Canadarm by fixing everything with strong glue.

Once the 3D parts are printed, I make sure each parts fit properly with the purchased components. I can now glue each sub assemblies together and let it dry to be able to fix those sub assemblies on the main assembly later on.
